There is surely no better marriage than that of the garden’s plant parts and the kitchen baker than gingerbread -- with the enduring love interest swirled up by the pixie dust of unbridled culinary imagination.
Take the spicy ingredients that come from roots, tree bark, flowers and seeds, mix in sweet sugar and molasses, along with some other things to stir the senses and cook up a holiday tradition that takes on shape-shifting forms and designs to dazzle all those sugar plum fairies – and confection dreams in all of us.
It’s no wonder that garden centers and botanical gardens turn to a gingerbread theme for sweet and magical inspiration during the holidays.
Botanical Gardens
Longwood Gardens
Sponsored and produced by Sickles Market recently-launched garden and food tours, a trip to Longwood Gardens revealed an elegant gingerbread-inspired theme.
According to our favorite garden guide, John Bertram, Longwood boasts 30,000 "Construction Grade" gingerbread ornaments; 10,000 gingerbread cookies, made by local baker Liz Marden, www.lizmarden.com
John also explained the food has a long tradition at Longwood, starting with the DuPont family. (Did you know DuPont is French for "of the bridge?" That is a perfect metaphor for Longwood Gardens too, as it "bridges" the worlds of edible gardens, display gardens and entertaining.
And January 1st remains "Calling Day" - a heritage that honors the family women who bake the gingerbread for the community and the men who call on the neighbors to share the holiday home-baked treats.
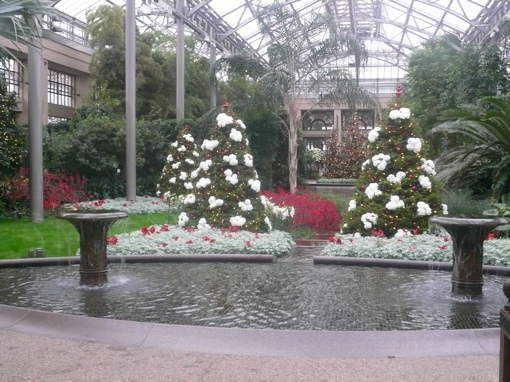
“This year Christmas at Longwood is sweeter than ever as the gardens are transformed into a gingerbread fantasyland featuring fanciful and imaginative displays.


Longwood landmarks recreated in gingerbread stand beneath towering trees adorned with gingerbread ornaments and the candy-laden Music Room overflows with sweet and colorful holiday cheer that look like crayola-colored ornaments in the jars stacked on candy store shelves behind,” according to Longwood.
The conservatory and original Du Pont homestead are lovingly rendered in a gingerbread house that will leave viewers breathless with their heart stopping architecture and spun sugar and “Cookie Construction!


Gingerbread wreaths hang with sweet dignity and gingerbread cookies drip from almost every tree and floral display at Longwood Gardens.

Docents are on hand with spicy samples to describe and delight visitors about gingerbread’s starring role.

Kirsty Dougherty, Director of Tours and Training, and Natale Siclare, Sickles Market, sprinkled a bit of their own pixie dust on the second luxury trip to Longwood in as many months. And could a man whose name means Christmas (Natale) not be the ideal holiday garden tour guide?! He located everything from unique garden plants to secret doors!
 |
| Red Twigged Dogwood allee fronting the English Yew |
 |
| Our favorite expert Longwood Garden Tour Guide, John Bertram, who volunteered just for us. How much do you love that bald cypress mulch - and John! His garden tales & historical references make the Garden ever more exciting & interesting. |
Along with Bob and Tori Sickles, and a chorus of Sickles elves, er staff, the trip was masterfully managed with just the right elixir to set the fa, la, la merry tone for holiday garden and food cheer.

Who better than Sickles’ expert cheesemonger, Cheri Scolari to lead the fun wine and cheese tasting on the trip home. After a delightful day strolling Longwood’s gingerbread-laden holiday horticultural displays, travel guests were snugly ensconced on the bus, and were soon astonished to receive a box of treats, courtesy of Sickles’ food elves. Oohs and ahhs soon led to mmmmm.
Cheri guided eager guests to discover a variety of three cheeses, and a choice of two wines.
For the Holiday wine and cheese tasting led by Cheri, the gifted treats included:
The Garden State’s Cherry Grove Buttercup Brie, soft ripened cow's milk
Zamorano, aged raw sheep's milk, Spain (like Manchengo but better)
Parmigiano Reggiano – aged raw cow's milk, Italy (Aged two years, from grass fed cows in the DOC = District Controlled Cheese, as authorized by the Italian governement.)
Accompanied by Marcona almonds and dried figs (be still my heart!)
Accompanied by Marcona almonds and dried figs (be still my heart!)
Pasticceri Filippi panettone artisanal handcrafted and wrapped in Vincenza, Italy. Full story here by Cheri on Sickles’ blog: http://bit.ly/rpX2op
A show of hands voted the Reggiano the favorite. My hands-down winning taste favorite
is the Lawrenceville, NJ grass-fed happy cow-in-the-pasture petite, creamy, buttery brie. This was especially good with chardonnay or a Fume Blanc, according to Cheri. She is a treasure trove of knowledge about wine and cheese pairings and food stories and legends and recipes. Don't miss her blogs or her feature piece in www.currentsNJ.com -- "Wine and Cheese: A Marriage Made in Heaven."
And she is just someone you want to have to dinner to enjoy her food bliss!
And she is just someone you want to have to dinner to enjoy her food bliss!
 |
| Sickles' Natale Siclare & Maria Steinberg |
My garden design client and muse, Maria Steinberg, took home the raffle winning Sickles confection, Gingerbread house, re-gifted by Lucy Matchett, our garden friend!
And the good will didn’t stop there.
I received this gorgeous paperwhite composition designed by Natale, that “clever clogs” as Kirsty says. And now the fragrance is in full, sweet throttle. I love paperwhites.
I know there are those who find the smell too heady. But not me. It just spells Christmas in a stately, in-your-senses kind of way.
 |
| Sickles Paperwhites floral design & look at the glamorous gift bag! |
And then, just when it couldn’t get any better, I received an email from Maria, saying she was going to Sickles to get all the tasting treats and would I want her to pick me up some?
You bet, I reply.
On the following Saturday, Maria gives me the full foodie treat “treatment” (hmm, maybe that’s the genesis of that word!). In any event, I was the lucky, lucky, happy recipient of the wine and cheese tasting – times two! Every cheese and the hand bow-tied panettone is superlative.
New York Botanical Garden (www.nybg.org) visitors should make a second stop after the Holiday Train show to indulge in the Gingerbread Adventures found a short walk away in the Everett Children’s Garden. Families shouldn’t miss the display of gingerbread houses.
This reporter launched the gingerbread house holiday program while working at NYBG – beginning with the Soutine Bakery from the upper west side in Manhattan – and am thrilled to see the special gingerbread display has taken on a tradition all its own.
According to NYBG: “Some of New York’s best and most imaginative bakers prepare an exhibit of whimsical, one-of-a-kind gingerbread creations sure to capture the imaginations of children and adults alike, while evoking all the wonder of the winter holiday season.
The bakers who are creating themed “Gingerbread Fantasy Houses” this year are: Lauri DiTunno, Cake Alchemy, Manhattan www.cakealchemy.com/
Irina Brandler, Sugar and Spice Bake Shop, the Bronx www.sugarandspiceonline.com/
Kaye and Liv Hansen, Riviera Bakehouse, Ardsley, NY www.thewhimsicalbakehouse.com/
and Kate Sullivan, Cake Power, Manhattan www.cakepower.com/
Other botanical gardens featuring gingerbread holiday houses and displays include Cleveland Botanic Garden (www.cbgarden.org), Boerner Botanical Gardens in Wisconsin and Huntsville Botanic Gardens (www.hsvbg.org)
The United States Botanic Garden http://www.usbg.gov/ and the garden even provides gingerbread house templates online: http://www.usbg.gov/whats-happening/exhibits/upload/Green-Roof-Gingerbread-House.pdf
Look for gingerbread displays in local hotels and restaurants too.
Who better to get a classic gingerbread recipe from than the award-winning, best-selling cookbook author Claudia Fleming? The following gingerbread recipe will be featured in this my soon to be published “Hamptons & Long Island Homegrown Cookbook.”
Recipes
North Fork Table and Inn, Claudia Fleming, Pastry Chef: (http://www.northforktableandinn.com/)
North Fork Table and Inn GINGERBREAD
STOUT BEER 1 CUP
MOLLASSES 1 CUP
BAKING SODA ½ TBLS
WHOLE EGGS 3 EA
WHITE GRAN SUGAR ½ CUP
DARK BROWN SUGAR ½ CUP
VEGETABLE OIL ¾ CUP
FRESH GRATED GINGER 2 ½ TBLS
AP FLOUR 2 CUPS
BAKING POWDER ½ TBLS
GROUND GINGER 2 TBLS
CINNAMON ¾ TSP
CLOVES 1/4TSP
NUTMEG ¼ TSP
CARDOMON 1/8 TSP
- SET OVEN TO 350 DEGREES. COMBINE BEER AND MOLLASSES IN SAUCEPAN, BRING TO BOIL. ADD BAKING SODA. (USE A LARGE POT, IT WILL FOAM UP) ALLOW TO COME TO ROOM TEMPERATURE
- IN A LARGE BOWL, COMBINE FLOUR AND SPICES.
- WHISK TOGETHER SUGAR AND EGGS, ADD OIL, WHISK WELL. ADD BEER/MOLLASSES MIXTURE, WHISK WELL.
- ADD LIQUID TO DRY SLOWLY, MIXING WELL. MIX IN FRESH GINGER.
- BUTTER (WELL) AND FLOUR A BUNDT PAN. POUR MIXTURE INTO PREPARED PAN BAKE APPROX 45 MIN – 1HR. UNTIL CAKE SPRINGS BACK TO THE TOUCH.
BAKE AT 350 DEGREES
And from the “all things food and garden gurus at Sickles, is the following gingerbread recipe:
Sickles Market Gingerbread Cookies
3 1/4 cups sifted all-purpose flour
3/4 teaspoon baking soda
3/4 cup (1 1/2 sticks) unsalted butter (room temperature, softened)
1/2 cup dark-brown sugar, packed
1 Tbsp ground ginger
1 Tbsp ground cinnamon
1/2 teaspoons ground cloves
1/2 teaspoon ground nutmeg
1/4 teaspoon finely ground black pepper
1/2 teaspoon salt
1 large egg
1/2 cup unsulfured molasses
Optional raisins, chocolate chips, candy pieces, frosting
Royal Icing
1 egg white
1/2 teaspoon lemon juice
1 3/4 cup confectioner’s sugar (powdered sugar)
Method
1 In a large bowl, sift together flour, baking soda, and spices. Set aside.
2 In an electric mixer fitted with the paddle attachment, cream the butter. Add sugar and beat until fluffy. Mix in eggs and molasses. Gradually add the flour mixture; combine on low speed. (You may need to work it with your hands to incorporate the last bit of flour.) Divide dough in thirds; wrap each third in plastic. Chill for at least 1 hour or overnight. Before rolling out, let sit at room temperature for 5-10 minutes. If after refrigerating the dough feels too soft to roll-out, work in a little more flour.
3 Heat oven to 350°. Place a dough third on a large piece of lightly floured parchment paper or wax paper. Using a rolling pin, roll dough 1/8 inch thick. Refrigerate again for 5-10 minutes to make it easier to cut out the cookies. Use either a cookie cutter or place a stencil over the dough and use a knife to cut into desired shapes. Press raisins, chocolate chips, or candy pieces in the center of each cookie if desired for "buttons".
4 Transfer to ungreased baking sheets. Bake until crisp but not darkened, 8 to 10 minutes. Remove from oven. Let sit a few minutes and then use a metal spatula to transfer cookies to a wire rack to cool completely. Decorate as desired.
Makes 16 5-inch long cookies.
Royal Icing
The traditional way to make Royal Icing is to beat egg whites and lemon juice together, adding the powdered sugar until the mixture holds stiff peaks. With modern concerns about salmonella from raw eggs, you can either use powdered egg whites or heat the egg whites first to kill any bacteria. With the heating method, mix the egg white and lemon juice with a third of the sugar, heat in a microwave until the mixture's temperature is 160°F. Then remove from microwave, and beat in the remaining sugar until stiff peaks form. Using the powdered egg whites method, combine 1 Tbsp egg white powder with 2 Tbsp water. Proceed as you would otherwise. (Raw egg white alternatives from the 2006 Joy of Cooking)
If the icing is too runny, add more powdered sugar until you get the desired consistency. Fill a piping bag with the icing to pipe out into different shapes. (Or use a plastic sandwich bag, with the tip of one corner of the bag cut off.) Keep the icing covered while you work with it or it will dry out.