Thursday, December 22, 2011

Landscape Re-Design: How to Install A Parking Court In a Small Front Garden

In late autumn, I got the email from the husband and wife that are two of my most favorite garden design clients, saying they wanted to put in a “driveway.”

They are a charming couple and their too adorable, too smart, modern day Shirley Temple daughter (but better); own a home worthy of a Dwell magazine spread. 
The house is perched on the edge of the Highlands, NJ terrain, with the back side decks and windows looking out to that incomparable view to Sandy Hook, New York’s Brooklyn, Long Island and the glittering Manhattan diamond-studded skyline as only seen from the Garden State.
Yes, the grass IS greener on the other side…   


I am not sure just when Americans determined small was not “good” for a home or even what constitutes small. 
I, for one, am a card-carrying opponent of the McMansion for more reasons than readers will care to hear.  Tearing out farmland to build houses with oh so many rooms that are never used (trust me, I have garden clients that share this scenario) and the use of plants and a watering system that rivals USGA grounds keeping – i.e. tooo much water pounding the yard, non-native plants and -- ooops. I said I would I wouldn’t go into all that.

What I am a fan of is the charm of the couple’s yes, smallish home and yes, its postage stamp sized garden.   
But think Europe or San Francisco or Charleston or other urban gardens and suddenly, one doesn’t feel so constrained but rather inspired. 
And I was.
From the time I met the couple and learned of their garden dreams – for the two of them, the home and especially for their young daughter. 


It was a challenge I cherished.  To bring design and charm to the garden for the family and neighbors to enjoy.
To create garden rooms that would bring pollinators for all to enjoy.  After all, in this part of the Garden State, we are right in the thick of the butterfly path. 
How glamorous!

The front garden was designed and installed in 2008 – just in time for their daughter’s birthday.  Upon completion, it was a TV moment not unlike the “move that truck” Home Improvement branded whoop that characterizes the renovation drama.  The birthday party guests were arriving just as we finished.
It was a squealing moment for us too as the pride of a job well done -- the owners poured champagne for the landscape team.
And the daughter tickled the latent flower buds of the Golden Rain Tree happy in her new flower and plant kingdom…

My Duchess Designs team has helped maintain the garden through spring wake ups and putting the bed to sleep for winters sleep. zzzzzz

But nothing prepared me for the request to add a “driveway” to the yard. 
The back story is the town had agreed to pay for/provide “aprons” to driveways for homeowners as part of the deal to compensate for the Sandy Hook bridge issue (don’t even think that I’m going to write the explanation story behind this disaster.  Let’s just say that the couple and the Highlands town handled this follow up payback masterfully.)

Besides taking advantage of the fact the town was covering the cost for the driveway aprons, the residents -- and in particular, my clients -- saw the opportunity to create a space that their cars could be safe from the demons of the snow plows that lock in the autos more than the natural snow does. 

The utility of the need was what helped drive my garden design concepts.
recycled, colored plastic
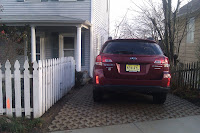
I spent time to develop the design concepts and much time researching materials, including colored recycled “rubber”/plastic and stones and what we finally went with, Turf Stone®  
I thought this paver was particularly suited for this design because we could preserve a garden look while establishing a solid parking court area for the cars that will respect the grade of the land and the garden design.

We met, reviewed the design concept options, budget estimates I’d researched and a plan for moving forward.

There was about 16 feet in front of the raised stone bed we created in 2008 where the cars would drive up to. 
Later we determined we’d “take” two additional feet of that raised bed for the parking court. 
We also stole a sizable chunk of the garden for the width to accommodate a car or two, also.  Just about 11’ wide.
All this “stealing” and removing green might have depressed another garden designer.
However, I thought of it as a zen-like garden design challenge to create something from “nothing.”

It was a further challenge to secure the landscaper who could execute the work according to the design, within the budget.
The work was like surgery given the size and scope and grade of the yard.
I did my due diligence and met with three landscapers.
My vote – and heart -- was always with T. Burke Honnold Landscapers. http://www.duchess-designs.com/NewJerseyLandscapeDesigner.html

Burke and his team did the extraordinary work on the garden with the first design.
I have worked with him and his top-notch team since I first started doing landscape design.  I have joyfully sung their praise and the integrity of their craft in news articles and in the feature pieces about me and Duchess Designs in Caroline Seebohm’s book, Cottages and Mansions of the Jersey Shore

We were most fortunate Burke agreed to take on the project.  We were set.

It took about three days of work for three men.  There was the removal of the raised beds, taking care with the blue stone in order to recreate “pinched” raised beds with the stones.  Plants were removed to be relocated later. 

The steps leading down to the side of the house were collapsed in order to maintain the grade and allow for the utility of the stairs. The stone stairs were measured and fixed with less of a riser.  This is a feat of engineering and labor. I had pangs of complete respect watching the men wield their level and only after much checking and consulting with one another, did they strap the stone and then lift to its new position. Wow.   

Once the front picket fence was cut – to be re-used as the side of the yard, and the area was cleared of the beds and grass and the sprinkler hoses were moved to the side where new heads in the spring will spray the grass that will grow up in the Turf Stone pavers, 


the team brought the layers of gravel and fine black sand to lay down prior to the pavers.


An oversight on my part led to having to do this work in two stages.  Upon discovery of this, I was overwrought that we lost time on this part of the projectt.  This never happened before… I should have seen the width was not as far over, flush with the side of the house.  I was working in the beds and thought it was being extended accordingly… Nevertheless, a Saturday powwow with the team and client followed and Burke and his team just jumped on it and got the job done. 
True Pros.
And work was executed perfectly, too.
I drove around to three nurseries/garden centers to secure the additional few pavers to complete the job.

The team laid in the pavers: then they marked for cutting, using the level over and over almost like a scraper. Then surgically installed the custom-cut pavers – like pieces in a puzzle.  
Methodically, with pride and precision.
Amazing.
Then the soil went back down, pushed in by hand with a pole and then smoothed over.  Grass seed went in at client’s request and will be followed by seed in the spring…

The fence work hit a snag, literally – at just the exact spot where the fence post was to go in, we discovered a huge, indigenous peanut stone, er boulder.   It was so large it had to be cut, not dug up.  The team was soon back on track and got the line of fence in, anchoring the posts with cement.  The gate was positioned across from where the car door might be once parked.
The plants that were removed were relocated in the new beds and in new spots around the house.

Neighbors started to compliment as early as Saturday morning while the work was being completed.
It is indeed a good design and a solid piece of landscape craftsmanship.  Altogether, it will make the client’s lifestyle better and I daresay increase the value of their home.

The main thing is that even at this time of year in the Northeast US, garden design dreams can come true.  And ultimately, the clients are happy with end result. 
And that makes it worth all the work. 

Put a big red bow on it!

Happy Holidays.


Sunday, December 18, 2011

Gingerbread Fantasies Sparkle the Holidays & Botanic Gardens

There is surely no better marriage than that of the garden’s plant parts and the kitchen baker than gingerbread -- with the enduring love interest swirled up by the pixie dust of unbridled culinary imagination. 

Take the spicy ingredients that come from roots, tree bark, flowers and seeds, mix in sweet sugar and molasses, along with some other things to stir the senses and cook up a holiday tradition that takes on shape-shifting forms and designs to dazzle all those sugar plum fairies – and confection dreams in all of us.

It’s no wonder that garden centers and botanical gardens turn to a gingerbread theme for sweet and magical inspiration during the holidays.

Botanical Gardens

Longwood Gardens
Sponsored and produced by Sickles Market recently-launched garden and food tours, a trip to Longwood Gardens revealed an elegant gingerbread-inspired theme. 

According to our favorite garden guide, John Bertram, Longwood boasts 30,000 "Construction Grade" gingerbread ornaments; 10,000 gingerbread cookies, made by local baker Liz Marden, www.lizmarden.com

John also explained the food has a long tradition at Longwood, starting with the DuPont family. (Did you know DuPont is French for "of the bridge?"  That is a perfect metaphor for Longwood Gardens too, as it "bridges" the worlds of edible gardens, display gardens and entertaining.
And January 1st remains "Calling Day"  - a heritage that honors the family women who bake the gingerbread for the community and the men who call on the neighbors to share the holiday home-baked treats.

“This year Christmas at Longwood is sweeter than ever as the gardens are transformed into a gingerbread fantasyland featuring fanciful and imaginative displays.


Longwood landmarks recreated in gingerbread stand beneath towering trees adorned with gingerbread ornaments and the candy-laden Music Room overflows with sweet and colorful holiday cheer that look like crayola-colored ornaments in the jars stacked on candy store shelves behind,” according to Longwood.    

The conservatory and original Du Pont homestead are lovingly rendered in a gingerbread house that will leave viewers breathless with their heart stopping architecture and spun sugar and “Cookie Construction!


Gingerbread wreaths hang with sweet dignity and gingerbread cookies drip from almost every tree and floral display at Longwood Gardens. 


Docents are on hand with spicy samples to describe and delight visitors about gingerbread’s starring role.   


Kirsty Dougherty, Director of Tours and Training, and Natale Siclare, Sickles Market, sprinkled a bit of their own pixie dust on the second luxury trip to Longwood in as many months.  And could a man whose name means Christmas (Natale) not be the ideal holiday garden tour guide?! He located everything from unique garden plants to secret doors!
Red Twigged Dogwood allee fronting the English Yew


Our favorite expert Longwood Garden Tour Guide, John Bertram, who volunteered just for us. How much do you love that bald cypress  mulch - and John! His garden tales & historical references make the Garden ever more exciting & interesting.


Along with Bob and Tori Sickles, and a chorus of Sickles elves, er staff, the trip was masterfully managed with just the right elixir to set the fa, la, la merry tone for holiday garden and food cheer. 

Who better than Sickles’ expert cheesemonger, Cheri Scolari to lead the fun wine and cheese tasting on the trip home.  After a delightful day strolling Longwood’s gingerbread-laden holiday horticultural displays,  travel guests were snugly ensconced on the bus, and were soon astonished to receive a box of treats, courtesy of Sickles’ food elves.  Oohs and ahhs soon led to mmmmm. 
Cheri guided eager guests to discover  a variety of three cheeses, and a choice of two wines. 


For the Holiday wine and cheese tasting led by Cheri, the gifted treats included:
            The Garden State’s Cherry Grove Buttercup Brie, soft ripened cow's milk
            Zamorano, aged raw sheep's milk, Spain (like Manchengo but better)
            Parmigiano Reggiano – aged raw cow's milk, Italy (Aged two years, from grass fed cows in the DOC = District Controlled Cheese, as authorized by the Italian governement.)

Accompanied by Marcona almonds and dried figs (be still my heart!)
            Pasticceri Filippi panettone artisanal handcrafted and wrapped in Vincenza, Italy.  Full story here by Cheri on Sickles’ blog: http://bit.ly/rpX2op

A show of hands voted the Reggiano the favorite. My hands-down winning taste favorite
is the Lawrenceville, NJ grass-fed happy cow-in-the-pasture petite, creamy, buttery brie.  This was especially good with chardonnay or a Fume Blanc, according to Cheri.  She is a treasure trove of knowledge about wine and cheese pairings and food stories and legends and recipes. Don't miss her blogs or her feature piece in www.currentsNJ.com -- "Wine and Cheese: A Marriage Made in Heaven."
And she is just someone you want to have to dinner to enjoy her food bliss!


Sickles' Natale Siclare & Maria Steinberg
My garden design client and muse, Maria Steinberg, took home the raffle winning Sickles confection, Gingerbread house, re-gifted by Lucy Matchett, our garden friend!  

And the good will didn’t stop there.


I received this gorgeous paperwhite composition designed by Natale, that “clever clogs” as Kirsty says.  And now the fragrance is in full, sweet throttle. I love paperwhites. 
I know there are those who find the smell too heady. But not me. It just spells Christmas in a stately, in-your-senses kind of way.
Sickles Paperwhites floral design & look at the glamorous gift bag!

And then, just when it couldn’t get any better, I received an email from Maria, saying she was going to Sickles to get all the tasting treats and would I want her to pick me up some?
You bet, I reply. 
On the following Saturday, Maria gives me the full foodie treat “treatment” (hmm, maybe that’s the genesis of that word!).  In any event, I was the lucky, lucky, happy recipient of the wine and cheese tasting – times two!  Every cheese and the hand bow-tied panettone is superlative.


New York Botanical Garden (www.nybg.org) visitors should make a second stop after the Holiday Train show to indulge in the Gingerbread Adventures found a short walk away in the Everett Children’s Garden. Families shouldn’t miss the display of gingerbread houses.
This reporter launched the gingerbread house holiday program while working at NYBG – beginning with the Soutine Bakery from the upper west side in Manhattan – and am thrilled to see the special gingerbread display has taken on a tradition all its own.
According to NYBG: “Some of New York’s best and most imaginative bakers prepare an exhibit of whimsical, one-of-a-kind gingerbread creations sure to capture the imaginations of children and adults alike, while evoking all the wonder of the winter holiday season. 

The bakers who are creating themed “Gingerbread Fantasy Houses” this year are: Lauri DiTunno, Cake Alchemy, Manhattan www.cakealchemy.com/

Irina Brandler, Sugar and Spice Bake Shop, the Bronx www.sugarandspiceonline.com/
 Kaye and Liv Hansen, Riviera Bakehouse, Ardsley, NY www.thewhimsicalbakehouse.com/
and Kate Sullivan, Cake Power, Manhattan www.cakepower.com/


Other botanical gardens featuring gingerbread holiday houses and displays include Cleveland Botanic Garden (www.cbgarden.org), Boerner Botanical Gardens in Wisconsin and Huntsville Botanic Gardens (www.hsvbg.org)
The United States Botanic Garden http://www.usbg.gov/  and the garden even provides gingerbread house templates online: http://www.usbg.gov/whats-happening/exhibits/upload/Green-Roof-Gingerbread-House.pdf

Look for gingerbread displays in local hotels and restaurants too.

Who better to get a classic gingerbread recipe from than the award-winning, best-selling cookbook author Claudia Fleming?  The following gingerbread recipe will be featured in this my soon to be published “Hamptons & Long Island Homegrown Cookbook.”

Recipes

North Fork Table and Inn, Claudia Fleming, Pastry Chef: (http://www.northforktableandinn.com/)


North Fork Table and Inn GINGERBREAD


STOUT BEER                   1 CUP                       
MOLLASSES                    1 CUP                       
BAKING SODA                ½ TBLS           
WHOLE EGGS 3 EA
WHITE GRAN SUGAR ½ CUP
DARK BROWN SUGAR ½ CUP
VEGETABLE OIL ¾ CUP
FRESH GRATED GINGER 2 ½ TBLS
AP FLOUR 2 CUPS
BAKING POWDER ½ TBLS
GROUND GINGER 2 TBLS
CINNAMON ¾ TSP
CLOVES 1/4TSP
NUTMEG ¼ TSP
CARDOMON 1/8 TSP

  1.  SET OVEN TO  350 DEGREES. COMBINE BEER AND MOLLASSES IN SAUCEPAN, BRING TO BOIL. ADD BAKING SODA. (USE A LARGE POT, IT WILL FOAM UP) ALLOW TO COME TO ROOM TEMPERATURE
  2. IN A LARGE BOWL, COMBINE FLOUR AND SPICES.
  3. WHISK TOGETHER SUGAR AND EGGS, ADD OIL, WHISK WELL. ADD BEER/MOLLASSES MIXTURE, WHISK WELL.
  4. ADD LIQUID TO DRY SLOWLY, MIXING WELL. MIX IN FRESH GINGER.
  5. BUTTER (WELL) AND FLOUR A BUNDT PAN. POUR MIXTURE INTO PREPARED PAN BAKE APPROX 45 MIN – 1HR. UNTIL CAKE SPRINGS BACK TO THE TOUCH.

BAKE AT 350 DEGREES


And from the “all things food and garden gurus at Sickles, is the following gingerbread recipe:

Sickles Market Gingerbread Cookies

3 1/4 cups sifted all-purpose flour
3/4 teaspoon baking soda
3/4 cup (1 1/2 sticks) unsalted butter (room temperature, softened)
1/2 cup dark-brown sugar, packed
1 Tbsp ground ginger
1 Tbsp ground cinnamon
1/2 teaspoons ground cloves
1/2 teaspoon ground nutmeg
1/4 teaspoon finely ground black pepper
1/2 teaspoon salt
1 large egg
1/2 cup unsulfured molasses
Optional raisins, chocolate chips, candy pieces, frosting

Royal Icing

1 egg white
1/2 teaspoon lemon juice
1 3/4 cup confectioner’s sugar (powdered sugar)
Method
1 In a large bowl, sift together flour, baking soda, and spices. Set aside.

2 In an electric mixer fitted with the paddle attachment, cream the butter. Add sugar and beat until fluffy. Mix in eggs and molasses. Gradually add the flour mixture; combine on low speed. (You may need to work it with your hands to incorporate the last bit of flour.) Divide dough in thirds; wrap each third in plastic. Chill for at least 1 hour or overnight. Before rolling out, let sit at room temperature for 5-10 minutes. If after refrigerating the dough feels too soft to roll-out, work in a little more flour.

3 Heat oven to 350°. Place a dough third on a large piece of lightly floured parchment paper or wax paper. Using a rolling pin, roll dough 1/8 inch thick. Refrigerate again for 5-10 minutes to make it easier to cut out the cookies. Use either a cookie cutter or place a stencil over the dough and use a knife to cut into desired shapes. Press raisins, chocolate chips, or candy pieces in the center of each cookie if desired for "buttons".

4 Transfer to ungreased baking sheets. Bake until crisp but not darkened, 8 to 10 minutes. Remove from oven. Let sit a few minutes and then use a metal spatula to transfer cookies to a wire rack to cool completely. Decorate as desired.

Makes 16 5-inch long cookies.

Royal Icing
The traditional way to make Royal Icing is to beat egg whites and lemon juice together, adding the powdered sugar until the mixture holds stiff peaks. With modern concerns about salmonella from raw eggs, you can either use powdered egg whites or heat the egg whites first to kill any bacteria. With the heating method, mix the egg white and lemon juice with a third of the sugar, heat in a microwave until the mixture's temperature is 160°F. Then remove from microwave, and beat in the remaining sugar until stiff peaks form. Using the powdered egg whites method, combine 1 Tbsp egg white powder with 2 Tbsp water. Proceed as you would otherwise. (Raw egg white alternatives from the 2006 Joy of Cooking)

If the icing is too runny, add more powdered sugar until you get the desired consistency. Fill a piping bag with the icing to pipe out into different shapes. (Or use a plastic sandwich bag, with the tip of one corner of the bag cut off.) Keep the icing covered while you work with it or it will dry out.


Friday, December 9, 2011

The Garden State Home Renovation Tips and Design Review

It seems there will be no gift of a completed home renovation project in time for Christmas. 

Work goes on for phase one.


That includes windows and French doors in the dining room and master bedroom suite, new roof (take that Nor’easters!), insulation, (getting some much needed warmth inside now that the weather is turning winter cold), and the first part of front porch frame and mason work, as well as the back porch addition off the dining room and next to the existing terrace.  This is where the Japanese soaking tub and yoga will be. And chairs for contemplation… And star gazing.
Here is where the Sunbrella fabric drapes will frame the view and offer privacy and shade.


roses watch the their new home companion
roofers start


start of loft


There is noodles of wiring meticulously threaded throughout the house by Harold, a darling, tidy electrician.
And there are miles of silver foil sheaths peeking out and twinkling behind the framing, knowing they will soon be hidden away, and what looks like plastic garbage bags channeling an amusement park tunnel attraction but is in fact part of the HVAC.

Once most of the framing and flooring was up, we could see we needed two windows that could open—positioned on either side of the center square window on the water side of the loft room perched over the new dining room.

In the areas where there was existing house: upstairs where the bedrooms and bathrooms are, we had to move all the "stuff" that was in the rooms and lined the walls. 
This was no small task; especially as all the house items and furniture from the living room and kitchen and garden room have already been moved to the garage. 
There is no place left to put the stuff!
We moved the upstairs room items to one side and put a drop cloth over the stuff.
The French door with soon-to-be-Juliet balcony was installed to my great delight.  How perfect it will be to wake up with light streaming into a new expanded bedroom and to enjoy the glistening water views and New York skyline and stately sailboats and frisky sunfish sailboats and cruise ships sailing hopefully to exotic ports from New York Harbor -- and our gardens below.  


We also wanted to offer our overnight guests more of the water and skyline and garden view too.  It was almost like one would have to peek through a squinted or squished viewfinder with the previous windows. Now there is a big, wide square happy window. 


The house, having been originally built in the 1960’s placed all the important rooms on the back side or southwest side of the house in order to safeguard the integrity of the windows from storms, especially the wicked Nor’easters that angrily whip through with impudence every season.  We’ve been told the windows back then just couldn’t sustain the winds and beating rain.

Now, the technology and window designs allow us to get creative with shapes and sizes and positioning. 

We selected the floor for the dining room.  It is comprised of 20x20 tiles – grayish/bluish with striations of coppery brownish.  Small copper squares will be placed artistically throughout the tiled floor area as accents.  This will accessorize the copper topped table to giddy design magazine-worthy heights!  The exciting part of this is the transition tiles I found to lead from the wood kitchen and living room floor to the dining room tile.  This transition tile is appropriately named Opulence.  Oooohh!  It looks like jewelry with tiny glass squares of dazzling copper, cinnamon, silvery-gray and saffron colored tile.  Perfect.  

I am finalizing the outdoor front walk, driveway and front herb garden designs. 
My design request - to be scaled for front porch
I forwarded the image of the front porch design to the masons via the architect – see here -  but they said the design was too big and if they were to do it would cost us $1,000 more to cut the bluestone and brick to scaled size. Further, they said the labor to put the bricks between the slate would require more money.  I suggested they stay within the budget parameters and provide a design opportunity that is close to the look we wanted without costing more. 


The design compromise that was emailed was a random bluestone patter -- too dizzying to work with the clean, straight-on walk design I envision and designed.  After some phone consultation, the mason brothers came over to meet and lay out my suggested alternative design concept, using 16" bluestone.  On the diagonal/diamond-shaped.  With bricks around the sides.  ^:^ Sounds pretty familiar? It worked for me!
The front steps will be 12" bluestone, framed by brick.    


We try to stay focused on the progress. We try to stay out of the dust.  We try not to think about the loss of privacy or the lack of space to put anything.  Thank goodness we have the Gotham apartment to live in during the week.  And my mother's welcoming condo down the street. On the water. We need to get away from all this plus the noise and mud and …

What I wasn’t prepared for is the lack of GC communication and the problems it’s caused. 
Santa should prepare for coal in stockings this year…

Coming up will be installation of the kitchen cabinets, making the template for the kitchen counters and island that will be used to cut the most beautiful marble this side of heaven.
The marble looks like the Caribbean Sea or the sky.  With stars and clouds.  I literally hugged it  when I came upon it. I knew it was for us!  
It took too long to find the cuts we coveted. But we prevailed.
It will look so dreamy mirroring and reflecting the water of the bay and the wide berth of sky behind and framing.

And the front door needs to go in. Right after they finish the front porch.

The siding will go up next week. We chose a bluish grayish shingle that will blend with the water beyond.  The color and style will also work with the existing brick siding on one part of the house that we will whitewash so that we achieve a kind of French country house effect.

We continue. 
So much of a home renovation is hope, tears, and attention to detail.  I advise all homeowners to over-manage. Do not allow anyone to take the reins or to think they control or selectively control the project. It must be very clear at the outset who is the client and how the relationship and process will proceed.  So much time is spent on the materials and design. When in fact, so much of the project is really about the chemistry found in the relationship between the architect and GC and the homeowner/client.
There is more than enough challenges and stress to go around. Be sure to partner with someone who shares your values and character as well as your style and vision.
Do not trust anyone with your budget.  The trust is too often misplaced.  Go over the numbers yourselves and then together with the GC manager. Sadly, professionalism can be in the eye of the doer.
Homeowners are so busy with their work and family lives that more often than not they do rely on the GC for that oversight management they are being paid for.  However they make mistakes.  Sometimes bad ones.

I also recommend having constant email and text updates. That’s worked very well for us.  Weekly meetings – not so much.  The meetings should be more than requests for money.  They should include design review before work is to begin in the areas next in the work flow schedule.  While we only had two change orders, we might have been able to realize the need for different windows if we had walked around once the part of the construction was completed to a point to see what was emerging. 
Take notes and write meeting reports to share with key decision makers.
Review and review and confirm.

The meetings should also foster a sense of team, shared responsibility and commitment and pride…

Weather plays a big role in home renovation in locales where there are four seasons.  Outside of getting the work done in the ideal temperature-kissed late spring through fall time period, there are still rainstorms.
And given climate change - - (yes, Virginia, there IS climate change!) there will be more wild swings in weather patterns including this year's hurricane, tornado, and earthquake. So I suggest looking to the weather channel's long-range forecast when planning the work schedule.  It's a good arrow in the quiver. And it's a good way to plan to use the teams for inside tasks when inclement weather prevents outdoor work.

Securing permits is also a time and schedule challenge that needs to be managed.

Take lots of pictures - before - and as the project progresses.

Have fun. Enjoy the path to a soon-to-be new style

More to come with completion of the house, phase one.  Then on to the the garden and driveway designs.